Friends,
In this post, we are going to discuss on HOW to move the data from a text file to Sql server database table. To achieve the same we are going to use Sql Server Import Export Wizard. This wizard helps to move the data for one source database (can be anything like RDBMS, Text files, Excel …) to destination database (can be anything like RDBMS, Text files, Excel …). Follow the below given steps –
1) The first and foremost step is to make the source ready and in our case it is flat file and created a flat file with four columns separated by TAB and rows by NEW COLUMN.
2) Now launch the Import and Export Wizard which is made available in many placed by Microsoft. In this post I will launch the wizard from below given path. All Programs àMicrosoft SQL Server 2008 à Import and Export Data (64-bit). Selected 64 bit as my system is 64 and you choose as per your system bit.
3) Clicking on Import and Export data will launch below shown wizard. Here we will fill in data about source and in our case it is Flat File –
4) Our source is txt file, so as already mentioned in screenshot we need to specify Data Source as Flat File, then in File name browse to file on disk. In Format select delimited as our text file has delimiter to segregate column values. Check Column names in the first data row.
5) Now click on Next or Columns to open below window. You can see preview of data here by clicking Preview.
6) Now clicking on next will go to Destination configuration window as displayed below. According to our requirement our destination in SQL server, therefore select OLEDB connection manager. Give Server Name and User Credentials to connect to server. Select database where importing needs to be done. Then click next.
7) Here we can map source with destination table. Edit Mapping can be used to change table structure and few other options. Here also we can see preview of data which is being imported. Remember that by default it will look for the destination table with the file name and if not available it will create new one. You can select if the destination table is other than the table name it is showing by simply clicking on the destination table name.
8) Below screen shows screen which will come when edit mapping will be clicked. Here you can check/change the data types and also few other options shown below.
9) Click OK and below screen will appear. We have few options available here. Here we will select Run immediately if you don’t want to save package. If you need to Save the package for future run then you can select the option “Save SSIS Package”.
10) Now click next. Next window will list a flow of actions which will be executed.
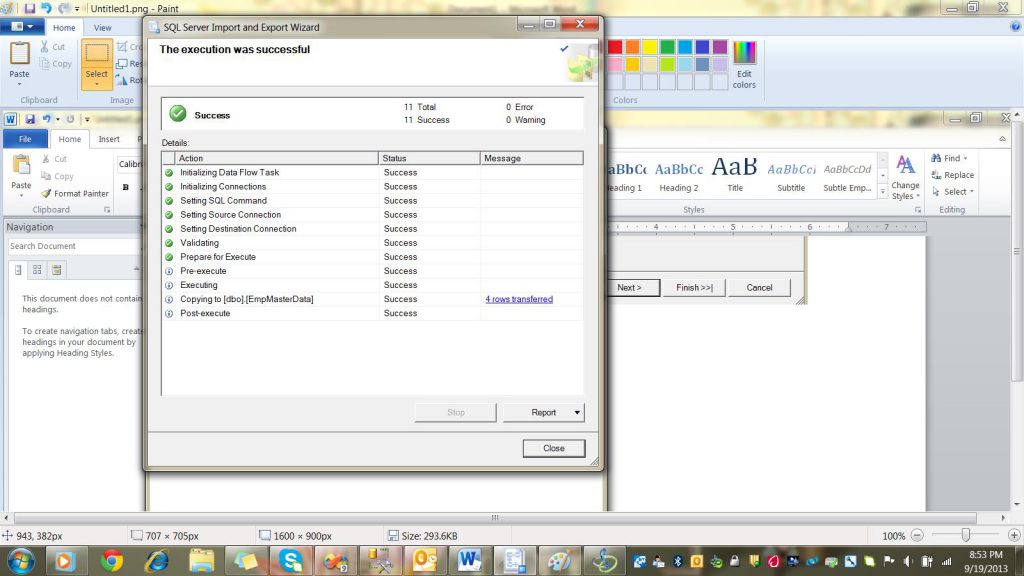
11) Now click Finish and data will be imported as shown below. Please check for all success messages.
12) Open Microsoft Management and run below query and check if data has been successfully imported or not.
That is it guys!! Easy right… Give a try… J
NOTE – This post is by Pallavi Singh (My Student). I just edited and uploaded to my site. Special thanks to Pallavi for the beautiful Screenshots.
Regards,
Roopesh Babu V


